
Have you ever seen a plate of beautifully decorated flower cookies and thought, I wish I could make those at home? Good news—you absolutely can! These edible works of art aren’t just for professionals; with a few simple steps, you can create stunning flower-shaped cookies that look (and taste) like they belong at a high-end bakery.
Whether you’re planning treats for a spring gathering, a bridal shower, or simply want to try your hand at creative baking, flower cookies are a fun and rewarding choice. With their vibrant colors, intricate designs, and endless customization options, they’re sure to impress both kids and adults alike. Even better, you don’t need fancy tools or expert skills—just a few easy-to-find ingredients and some creativity.
In this post, we’ll walk you through:
- The essential ingredients and tools you’ll need to make flower cookies from scratch.
- A step-by-step guide to preparing, baking, and decorating like a pro.
- Expert tips for achieving picture-perfect results, along with fun variations and serving ideas.
Ready to create something that’s almost too pretty to eat? Let’s dive in and bring your baking dreams to life! (For more inspiration, check out this guide to royal icing techniques from King Arthur Baking.)
Key Benefits of Making Flower Cookies
Perfect for Special Occasions
Flower cookies are the perfect treat to elevate any special occasion. Whether it’s a wedding, birthday party, or a baby shower, these vibrant, beautifully decorated cookies add a touch of elegance to your celebration. Their intricate flower shapes make them not just a treat but also a conversation starter. Guests will be wowed by both their beauty and taste, making them a hit at any event.
For example, I once made sunflower cookies for a friend’s bridal shower, and they were a huge success. The cookies matched the rustic theme perfectly and became the highlight of the dessert table! They also make thoughtful party favors—wrap them up in cellophane bags with a ribbon for a sweet and personal gift.
Flower cookies are also great for holidays, like Easter and Mother’s Day, where you can customize the colors to fit the festive spirit.
Have you ever baked flower cookies for a special occasion? What designs or colors do you love to use? Share your ideas or any twists you’ve added to the recipe—I’d love to hear your creative takes!
Fun and Creative Activity
Baking flower cookies is more than just a cooking task—it’s a fun and creative activity that anyone can enjoy! Whether you’re a beginner or an experienced baker, decorating flower cookies allows you to unleash your inner artist. You don’t need to be a professional to create beautiful, intricate designs; with a little practice and some patience, you’ll be amazed at what you can achieve.
Gather your family, friends, or kids, and make an afternoon of it! It’s a great bonding experience, especially when everyone gets involved in decorating. You can try different color combinations, add sprinkles, or experiment with patterns to create a variety of flower designs. The best part? You get to enjoy the delicious results together.
I’ve had several cookie-decorating sessions with friends, and every time, we end up with a batch of unique, personalized cookies. It’s always a hit, whether we’re creating flower cookies for a party or just having fun on a weekend afternoon.
What creative twists do you like to add when making flower cookies? Do you go bold with colors, or stick to soft pastels? Share your ideas—let’s inspire each other!
Ingredients Needed for Flower Cookies
Essential Baking Ingredients

To make perfect flower cookies, you don’t need a long list of ingredients—just a few key staples that come together to create a delicious and sturdy dough for decorating. Here’s what you’ll need:
- All-purpose flour: This is the base of your dough. It gives the cookies structure and helps them hold their shape when baked.
- Butter: For a rich, melt-in-your-mouth texture, butter is a must. It adds flavor and creates a tender crumb.
- Sugar: A combination of granulated and powdered sugar ensures the right balance of sweetness while also helping the dough hold together.
- Eggs: Eggs help bind the ingredients together and provide structure for the cookies.
- Vanilla extract: This adds a warm, sweet flavor that complements the richness of the dough.
- Baking powder: This ensures the cookies have the right amount of rise, keeping them soft and slightly chewy.
For decorating:
- Royal icing: This is the go-to for decorating flower cookies. It dries hard, allowing you to pipe intricate designs without smudging.
- Food coloring: Whether you’re going for pastel petals or vibrant blooms, gel food coloring works best for a bold and consistent look.
These ingredients come together to create a dough that’s both easy to work with and delicious. Ready to start baking? Let’s move on to the next step!
Tools and Decorations
Creating stunning flower cookies requires a few essential tools and decorations that will help bring your designs to life. While you don’t need a ton of fancy equipment, having the right tools can make the process easier and more enjoyable.
Essential Tools
- Rolling pin: A rolling pin helps flatten your dough evenly to the right thickness for cutting out perfect cookie shapes.
- Cookie cutters: Flower-shaped cookie cutters come in various sizes. A set with different petal designs can help you create a variety of flowers.
- Piping bags and tips: To decorate with royal icing, piping bags are a must. Use different tips for detailed designs, like round tips for outlines and petal tips for flower shapes.
- Offset spatula: A small offset spatula is great for spreading icing smoothly and precisely, especially for covering large areas of the cookie.
- Cooling rack: After baking, place your cookies on a cooling rack to ensure they don’t become soggy while cooling.
Decorative Elements
- Royal icing: This is your go-to for creating beautiful designs. You can tint it with food coloring to match any color scheme.
- Edible glitter or sprinkles: Add a little sparkle to your flowers with edible glitter or sprinkles. They’re perfect for giving your cookies an extra touch of elegance.
- Colored sugar: Fine colored sugar is great for adding texture or making flower centers stand out.
Step-by-Step Instructions for Making Flower Cookies
Preparing the Dough and Shaping the Cookies

Now that you have your ingredients and tools ready, it’s time to prepare the dough and shape your flower cookies! This step is all about creating a smooth, workable dough and cutting it into beautiful shapes that will hold up during baking. Follow these simple steps for success:
Preparing the Dough
- Cream the butter and sugar: Start by beating the butter and granulated sugar together until the mixture is light and fluffy. This helps incorporate air into the dough, making it tender.
- Add the eggs and vanilla: Mix in the eggs, one at a time, along with the vanilla extract. These ingredients add flavor and bind the dough together.
- Combine the dry ingredients: In a separate bowl, whisk together your all-purpose flour, baking powder, and a pinch of salt. Gradually add this to the wet ingredients, mixing until the dough just comes together.
- Chill the dough: Wrap the dough in plastic wrap and chill it in the refrigerator for at least 30 minutes. Chilling helps firm the dough, making it easier to roll out and preventing the cookies from spreading too much during baking.
Shaping the Cookies
- Roll out the dough: After chilling, roll the dough onto a lightly floured surface until it’s about 1/4 inch thick. This ensures the cookies won’t be too thick or too thin once baked.
- Cut out flower shapes: Use flower-shaped cookie cutters to cut the dough into flower designs. For added variety, try using different flower cutters or even layering smaller shapes on top of larger ones to create unique flowers.
- Bake the cookies: Place the shaped cookies on a parchment-lined baking sheet and bake at 350°F for 8-10 minutes or until the edges are lightly golden. Let them cool completely before decorating.
Now you’re ready to move on to the fun part—decorating your flower cookies! These first steps lay the foundation for beautiful, perfectly shaped cookies that will be a hit at any event.
Baking and Decorating the Cookies
After shaping your flower cookies, it’s time to bake and decorate them! This step brings your creative vision to life, turning your cookies into beautiful, edible works of art. Let’s go through the process, step by step.
Baking the Cookies
- Preheat the oven: Start by preheating your oven to 350°F (175°C). This ensures the cookies bake evenly and don’t spread too much.
- Arrange the cookies: Place your shaped cookie dough on a parchment-lined baking sheet, leaving space between each cookie so they don’t stick together.
- Bake: Put the cookies in the oven and bake for 8-10 minutes. Keep an eye on them, as baking times may vary slightly depending on your oven. The cookies should be lightly golden around the edges but still soft in the center.
- Cool the cookies: Once baked, remove the cookies from the oven and let them cool on a wire rack. This is important to prevent the royal icing from melting when you decorate them.
Decorating the Cookies
- Make the royal icing: To make the royal icing, combine powdered sugar, egg whites (or meringue powder), and a little water. Mix until the icing forms stiff peaks. Divide the icing into bowls and color with food coloring to create your desired palette of flower hues.
- Outline the flowers: Using a piping bag fitted with a small round tip, outline the edges of your flower cookies. This gives them a neat, defined shape. Let the outline dry for 10-15 minutes.
- Flood the cookies: Once the outline is dry, fill the inside of the flower shape with royal icing, using a piping bag or an offset spatula to spread it evenly. Allow the base layer to dry before adding details.
- Add floral details: Once the base layer is set, you can pipe delicate petals, flower centers, and leaves with different colored icing. Use various piping tips to create texture and intricate designs that will make your cookies pop.
- Add finishing touches: For a bit of sparkle, sprinkle edible glitter, colored sugar, or tiny sprinkles over the dried icing. These little touches make your flower cookies shine!
With these baking and decorating steps, you’ll end up with beautiful flower cookies that are perfect for any occasion. Don’t forget to let your cookies dry completely before serving or packaging them up as gifts!
Pro Tips and Variations for Perfect Flower Cookies
Pro Tips for Decorating Like a Pro
Want to decorate your flower cookies like a true professional? Here are a few pro tips to make your cookies stand out:
1. Use Piping Gel for Smooth Flooding
Add piping gel to your royal icing for a smooth, even flood when decorating your cookies. This technique helps the icing spread evenly without any lumps or bumps.
2. Create Ombre Effects
Achieve a stunning ombre effect by using darker colors at the base of the flower and lighter ones at the tips. This creates a beautiful, gradient look that makes your flowers pop.
3. Experiment with Different Piping Tips
Different piping tips can create unique textures and designs. Use petal tips for delicate petals and leaf tips to add foliage around your flowers.
4. Let Icing Dry Between Layers
Allow each layer of icing to dry before adding more details. This will prevent colors from bleeding and ensure sharp, clean designs.
5. Add Edible Glitter or Sprinkles
For a touch of sparkle, sprinkle edible glitter or small sprinkles on your cookies. These additions can highlight your flower centers or add extra texture to the petals.
Creative Variations to Try
Here are some fun ideas to make your flower cookies even more unique:
1. Use Different Flower Shapes
Mix and match flower cutters like daisies, sunflowers, and roses to create a vibrant bouquet of cookies.
2. Try Royal Icing Transfers
Pipe designs ahead of time and place them on cookies for intricate and layered decorations.
3. Incorporate Colorful Sugar Crystals
Add sparkle to your cookies with colorful sugar crystals before or after decorating.
4. Play with Different Icing Techniques
Experiment with techniques like wet-on-wet or stenciling for creative designs on flower petals.
5. Add a Touch of Edible Gold or Silver
Elevate your cookies with edible gold or silver leaf for a luxurious finish.
These variations will help your flower cookies stand out and bring a fun twist to your creations!
Serving Suggestions for Flower Cookies
Perfect Pairings
Flower cookies can be the star of any occasion, and pairing them with the right treats or drinks can make your presentation even more delightful. Here are some ideas to elevate your cookie experience:
1. Pair with Fresh Fruit
A light and refreshing complement to your flower cookies, fresh fruit like berries or citrus slices balances out the sweetness. This pairing adds a fresh and colorful touch to your dessert table.
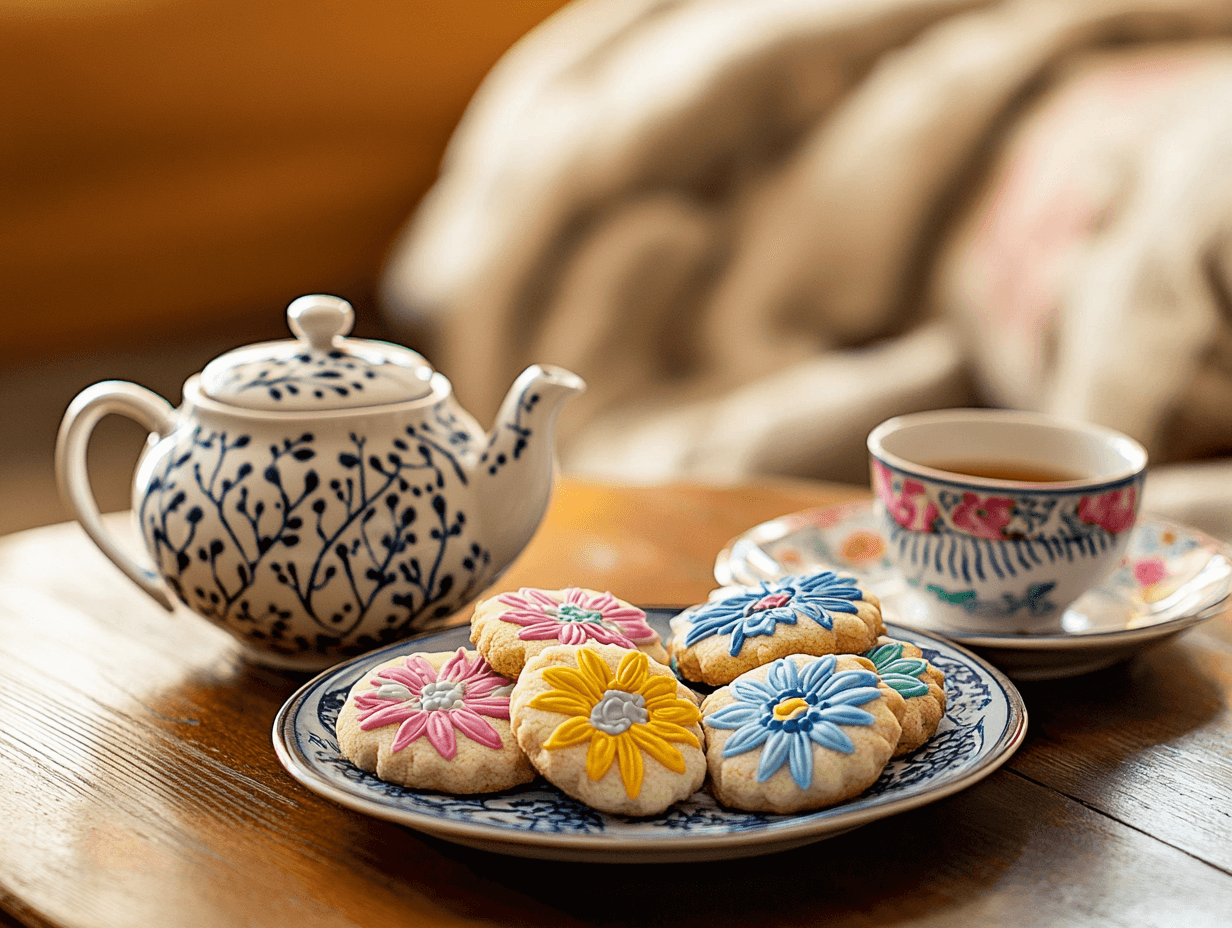
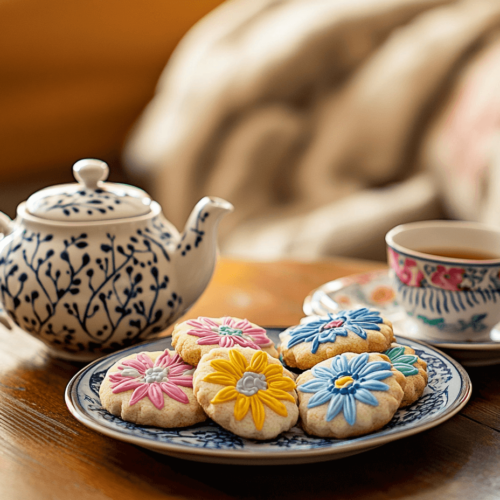
2. Serve with a Cup of Tea
Flower cookies and tea are a classic combination! Choose floral teas like chamomile, jasmine, or rose for a harmonious match. The subtle flavors of the tea enhance the delicate taste of the cookies, making for a cozy, elegant treat.
3. Complement with Fruit Sorbet
If you’re serving your flower cookies in the warmer months, pair them with a refreshing scoop of fruit sorbet. The cold, fruity flavor contrasts perfectly with the sweetness of the cookies.
4. Combine with Champagne or Sparkling Wine
For a special celebration, pair your flower cookies with a glass of champagne or sparkling wine. The light bubbles and dry finish of the drink complement the sweetness of the cookies, making it a great option for parties or weddings.
Gifting Ideas

Flower cookies make for a thoughtful and personalized gift, and there are plenty of creative ways to package and present them. Here are some gifting ideas to make your flower cookies even more special:
1. Cookie Gift Box
Package your beautifully decorated flower cookies in a charming gift box. You can fill the box with a variety of flower shapes and colors for a fun and visually appealing treat. Add a personalized note or ribbon to complete the gift.
2. DIY Flower Cookie Bouquet
Create a unique flower cookie bouquet by attaching each cookie to a stick and arranging them like flowers in a vase. This creative presentation makes for a lovely centerpiece or a memorable gift for birthdays, Mother’s Day, or special occasions.
3. Custom Cookie Jar
Gift your flower cookies in a decorative jar with a custom label. You can add a personal touch by including the recipient’s name or a special message. This idea works great for holidays or as a thank-you gift.
4. Flower Cookie Favors for Weddings or Parties
Flower cookies can also serve as sweet party favors. Package them in small bags or boxes with personalized tags. These make a perfect treat for weddings, baby showers, or garden parties.
5. Basket of Assorted Cookies
Create a gift basket filled with a variety of flower cookies along with other homemade treats like biscotti or shortbread. This diverse selection will make the gift even more delightful for the recipient.
Master the Art of Flower Cookies
Flower cookies are the perfect way to express your creativity and make any occasion extra special. Whether you’re a beginner or a seasoned baker, decorating flower cookies can be both fun and rewarding. With the right tools, techniques, and a bit of practice, you’ll soon be creating beautiful, delicious flower cookies that are sure to impress your friends, family, or guests. From experimenting with different shapes to adding personalized decorations, the possibilities are endless. So, roll up your sleeves and start baking today—you’ll be mastering the art of flower cookies in no time!
Flower Cookies
Ingredients
- 2 cups all-purpose flour / 300g
- 1 cup unsalted butter, room temperature / 227g
- 3/4 cup granulated sugar / 150g
- 1 1 large egg
- 1 tsp vanilla extract
- 1/2 tsp salt
- 1/2 tsp baking powder
Royal icing (for decorating)
- 1 egg white or 1 1/2 tsp meringue powder
- 1/2 cups powdered sugar / 180g
- 1 tsp lemon juice
- Food coloring (optional)
Instructions
- Prepare the Dough:In a large mixing bowl, cream together the butter and sugar until light and fluffy.Beat in the egg and vanilla extract, mixing until smooth.In a separate bowl, whisk together the flour, salt, and baking powder.Gradually add the dry ingredients to the wet ingredients, mixing until combined.Divide the dough into two portions, wrap them in plastic wrap, and chill for at least 1 hour.
- Shape the Cookies:Preheat the oven to 350°F (175°C).Roll out the dough on a lightly floured surface to about 1/4 inch thick.Use flower-shaped cookie cutters to cut out the dough and place the cookies on a baking sheet lined with parchment paper.Bake for 10–12 minutes or until the edges are golden brown. Allow the cookies to cool on a wire rack.
- Decorate the Cookies:Prepare the royal icing by whisking egg whites (or meringue powder) with powdered sugar and lemon juice until stiff peaks form.Divide the icing into separate bowls and add food coloring if desired.Pipe the icing onto the cookies in flower shapes, starting with the petals and adding details like the center of the flowers.
Notes
-
Optional Notes:
- Substitute meringue powder for egg whites to avoid using raw eggs.
- Use gel food coloring for brighter and more vibrant cookie decorations.
FAQs About Flower Cookies
1. Can I use a different type of icing for flower cookies?
Yes, while royal icing is a popular choice for flower cookies due to its smooth finish and ability to hold shapes, you can also use fondant, buttercream, or glaze, depending on your preferences and the look you want to achieve.
2. How do I prevent my flower cookies from spreading during baking?
To prevent your flower cookies from spreading too much, chill the dough before baking. This helps the cookies maintain their shape and keeps the decorations intact.
3. Can I make flower cookies in advance?
Absolutely! You can make and decorate your flower cookies in advance. Just store them in an airtight container to keep them fresh, and they’ll be perfect for gifting or serving later.
4. How long will decorated flower cookies last?
Decorated flower cookies can last up to a week if stored properly in an airtight container. If you want them to last longer, you can freeze them for up to three months.
5. Can I make flower cookies gluten-free?
Yes! Simply swap out regular flour for a gluten-free flour blend, and you’ll have a gluten-free version of these delicious cookies that everyone can enjoy.